
Air Fryer Cheesy Tortilla Garlic Bread Recipe
If you’re craving something crispy, cheesy, and bursting with garlic flavor, then you absolutely have to try this Air Fryer Cheesy Tortilla Garlic Bread. It’s a total game-changer for quick snacks or sides that feel indulgent but come together in a flash. The crisp edges of the tortilla paired with gooey mozzarella and savory Parmesan create an irresistible combo that’s tough to put down. Plus, it’s made effortlessly in the air fryer, giving you perfectly golden and melty garlic bread without needing to heat up your oven or wait around.

Ingredients You’ll Need
The beauty of this Air Fryer Cheesy Tortilla Garlic Bread lies in its simplicity. Each ingredient plays a crucial role, from the soft tortillas providing a sturdy yet crispy base, to the blend of cheeses delivering that deliciously melty, savory flavor. The garlic and herbs infuse every bite with aromatic goodness, making this dish more than just a quick snack.
- 4 large flour tortillas: These serve as the perfect, crispy canvas for all the cheesy, garlic goodness to melt onto.
- 1/2 cup shredded mozzarella cheese: Brings the classic melting quality and milky flavor we all love in garlic bread.
- 1/4 cup grated Parmesan cheese: Adds a sharp, nutty bite that complements the mozzarella beautifully.
- 2 tablespoons unsalted butter, melted: Essential for coating the tortillas and carrying the garlic flavor throughout.
- 2 cloves garlic, minced: Fresh garlic punches up the aroma and taste for that authentic garlic bread experience.
- 1/2 teaspoon dried parsley: Sprinkled on top for a pop of color and a touch of herbaceous freshness.
- 1/4 teaspoon garlic powder: Enhances the garlic flavor and balances the fresh minced garlic.
- 1/4 teaspoon salt: Rounds out the flavors and elevates the entire dish.
How to Make Air Fryer Cheesy Tortilla Garlic Bread
Step 1: Preheat the air fryer
Start by setting your air fryer to 375°F (190°C). This temperature is just right to melt the cheese perfectly and crisp up the tortillas without burning them. Preheating ensures your garlic bread cooks evenly from the moment you place it inside.
Step 2: Make the garlic butter mixture
In a small bowl, combine the melted butter with minced garlic, garlic powder, and salt. This mixture is what gives the bread that irresistible savory and aromatic base. Make sure the butter is fully melted so it coats the tortillas smoothly.
Step 3: Brush tortillas with garlic butter
Generously brush one side of each tortilla with your garlic butter. This is where the magic starts—every bite will have a rich, garlicky taste enhanced by the buttery texture that crisps up beautifully in the air fryer.
Step 4: Add the cheeses
Sprinkle shredded mozzarella and grated Parmesan evenly over the buttered side of each tortilla. Don’t be shy here; an even layer ensures every piece gets that gooey, melty coverage that makes this dish so addictive.
Step 5: Air fry the tortillas
Place the tortillas cheese-side up in the air fryer basket in a single layer. Depending on the size of your basket, you may need to work in batches. Air fry for 3 to 5 minutes until the cheese is melted and bubbly with lightly golden edges. Keep a close eye to avoid overcooking.
Step 6: Add parsley and cut into wedges
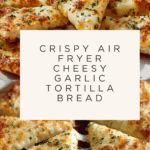
As soon as the tortillas come out, sprinkle with dried parsley for a fresh, colorful finish. Then, slice them into wedges – just like classic garlic bread – and get ready to enjoy!
How to Serve Air Fryer Cheesy Tortilla Garlic Bread

Garnishes
For a final flourish, fresh chopped parsley or cilantro adds a bright and inviting touch to your Air Fryer Cheesy Tortilla Garlic Bread. You can also sprinkle a pinch of red pepper flakes if you want a subtle kick, or drizzle a little olive oil infused with chili or herbs for an elegant finish.
Side Dishes
This cheesy garlic bread is excellent alongside soups like tomato basil or creamy broccoli cheddar. It also pairs beautifully with salads, or as an appetizer alongside your favorite dips such as marinara sauce, ranch dressing, or even guacamole. It’s versatile enough to complement just about any meal.
Creative Ways to Present
Try stacking wedges with a layer of pepperoni and a sprinkle of extra cheese before air frying for a pizza-inspired upgrade. Alternatively, cut into smaller bite-sized pieces for party platters or serve with a side of salsa and sour cream for a Mexican twist that guests will love.
Make Ahead and Storage
Storing Leftovers
If you have leftover Air Fryer Cheesy Tortilla Garlic Bread, store it in an airtight container at room temperature for up to two days. This prevents the bread from getting soggy and keeps the cheese fresh for your next snack time.
Freezing
You can freeze uncooked tortillas topped with the garlic butter and cheese in a single layer on a baking sheet. Once frozen solid, transfer them to a freezer bag and keep for up to one month. When ready, simply air fry from frozen, adding a minute or two to the cooking time.
Reheating
Reheat leftover slices in the air fryer at 350°F (175°C) for 2 to 3 minutes until warmed through and crisp again. Avoid microwaving if you want to maintain that perfectly crispy texture and melty cheese consistency.
FAQs
Can I use other types of tortillas?
Absolutely! While large flour tortillas work best for the traditional texture, you can experiment with whole wheat or corn tortillas. Just note that corn tortillas may crisp differently and can be a bit more delicate in the air fryer.
What can I substitute for mozzarella cheese?
If mozzarella isn’t on hand, try using provolone, Monterey Jack, or even a mild cheddar. These cheeses melt well and will still give you that luscious, cheesy pull with a slightly different flavor profile.
Is it necessary to use fresh garlic?
Fresh garlic elevates the flavor with its pungent aroma, but if you only have garlic powder, you can increase it to a half teaspoon and skip the fresh garlic. The dish will still be tasty, just with a slightly different garlic intensity.
Can I add herbs other than parsley?
Definitely! You can use dried oregano, basil, or Italian seasoning to add a herby twist to your Air Fryer Cheesy Tortilla Garlic Bread. Just sprinkle your chosen herbs on top after air frying for the best flavor.
How crisp does the Air Fryer Cheesy Tortilla Garlic Bread get?
The edges get satisfyingly crispy while the cheese remains gooey and melty on top. The air fryer crisps the tortilla quickly, giving you that perfect contrast of textures in every bite.
Final Thoughts
Once you try this Air Fryer Cheesy Tortilla Garlic Bread, it’s going to become your go-to for whenever a cheesy, garlicky craving hits. It’s effortless to make, wonderfully flavorful, and perfectly crispy, all thanks to the magic of the air fryer. Trust me, you’re going to want to keep this recipe close for quick snacks, party appetizers, or simple weeknight treats that feel like a celebration.
PrintAir Fryer Cheesy Tortilla Garlic Bread Recipe

This Air Fryer Cheesy Tortilla Garlic Bread is a quick and delicious snack that combines crispy tortillas with melted mozzarella and Parmesan cheese, infused with garlic and butter flavor. Perfect for a speedy appetizer or a tasty side, this recipe uses the air fryer for an easy, mess-free cooking experience with golden, bubbly cheese and crunchy edges.
- Prep Time: 5 minutes
- Cook Time: 5 minutes
- Total Time: 10 minutes
- Yield: 4 servings 1x
- Category: Snack, Appetizer
- Method: Air Frying
- Cuisine: American
- Diet: Vegetarian
Ingredients
Cheesy Garlic Butter Mixture
- 2 tablespoons unsalted butter, melted
- 2 cloves garlic, minced
- 1/4 teaspoon garlic powder
- 1/4 teaspoon salt
Cheesy Tortillas
- 4 large flour tortillas
- 1/2 cup shredded mozzarella cheese
- 1/4 cup grated Parmesan cheese
- 1/2 teaspoon dried parsley, for garnish
Instructions
- Preheat the Air Fryer: Set your air fryer to 375°F (190°C) and allow it to preheat fully, ensuring even cooking for your cheesy tortillas.
- Prepare the Garlic Butter Mixture: In a small bowl, combine the melted unsalted butter, minced garlic, garlic powder, and salt. Mix well to evenly distribute the flavors.
- Brush Tortillas: Using a brush, evenly coat one side of each flour tortilla with the garlic butter mixture, making sure the surface is well covered to impart maximum flavor.
- Add Cheese: Sprinkle the shredded mozzarella and grated Parmesan cheese evenly over the buttered side of each tortilla, creating a good cheese layer for bubbling and melting.
- Arrange in Air Fryer: Place the tortillas cheese side up in the air fryer basket in a single layer. If needed, cook them in batches to avoid overlapping and to ensure crispiness.
- Air Fry: Cook the tortillas for 3-5 minutes or until the cheese has fully melted, looks bubbly, and the tortilla edges are golden brown and crisp.
- Garnish and Serve: Remove the crispy cheesy tortillas from the air fryer, sprinkle with dried parsley for a fresh herby finish, cut into wedges, and serve immediately while hot and gooey.
Notes
- For a spicier kick, add a pinch of red pepper flakes to the garlic butter mixture.
- You can substitute mozzarella cheese with a blend of cheddar and Monterey Jack for a different flavor profile.
- Make sure not to overcrowd the air fryer basket for even cooking and crispy edges.
- Use fresh garlic for a more intense garlic flavor compared to garlic powder alone.
- If you want a gluten-free option, use gluten-free tortillas instead of flour tortillas.
Nutrition
- Serving Size: 1 tortilla wedge (1/4 of a tortilla)
- Calories: 180
- Sugar: 1g
- Sodium: 230mg
- Fat: 10g
- Saturated Fat: 5g
- Unsaturated Fat: 4g
- Trans Fat: 0g
- Carbohydrates: 18g
- Fiber: 1g
- Protein: 7g
- Cholesterol: 20mg
Keywords: air fryer garlic bread, cheesy tortilla snack, easy appetizer, quick snack, cheesy garlic bread, air fryer recipes


