
Crispy and Chewy Artisan Pizza Dough with Bubbly Crust Recipe
Introduction
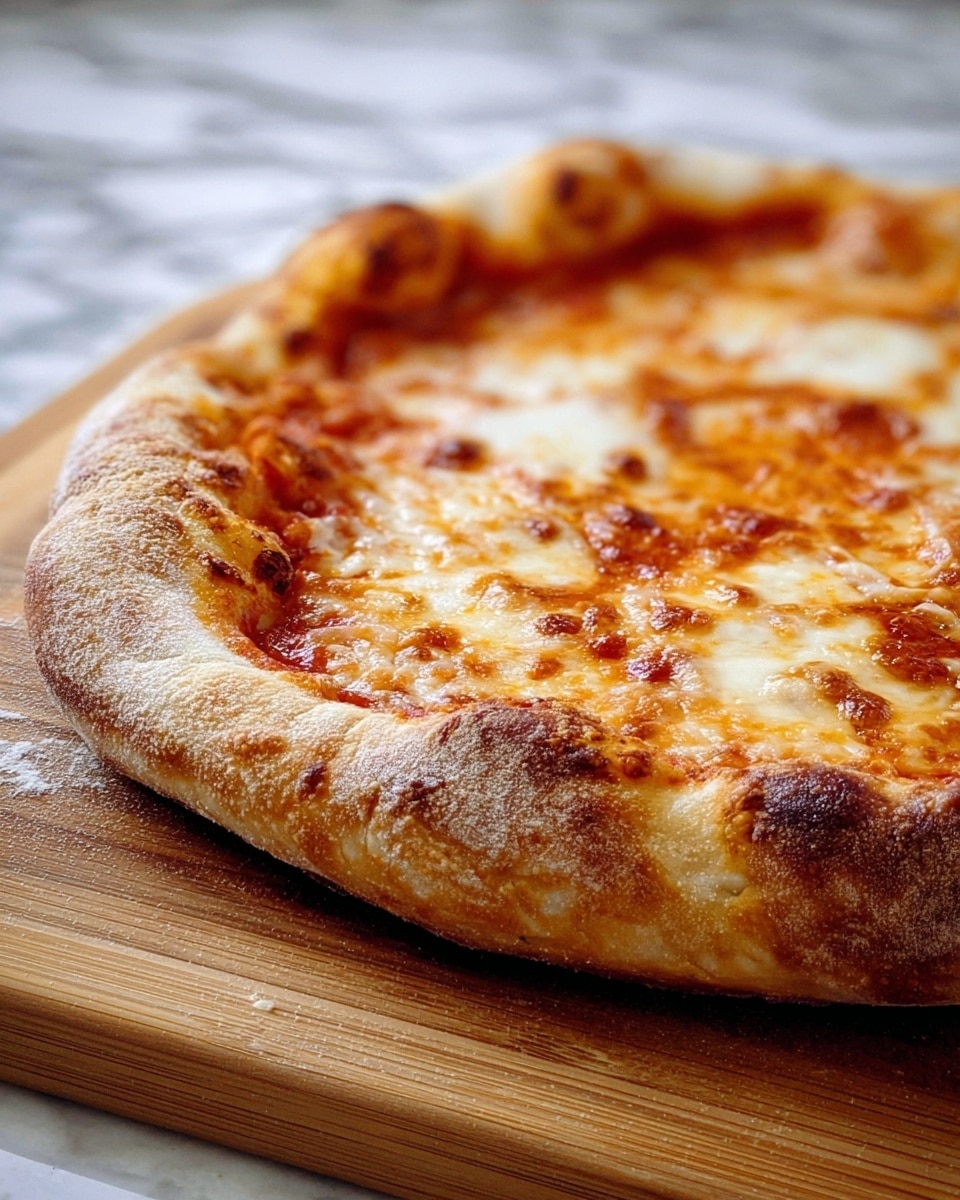
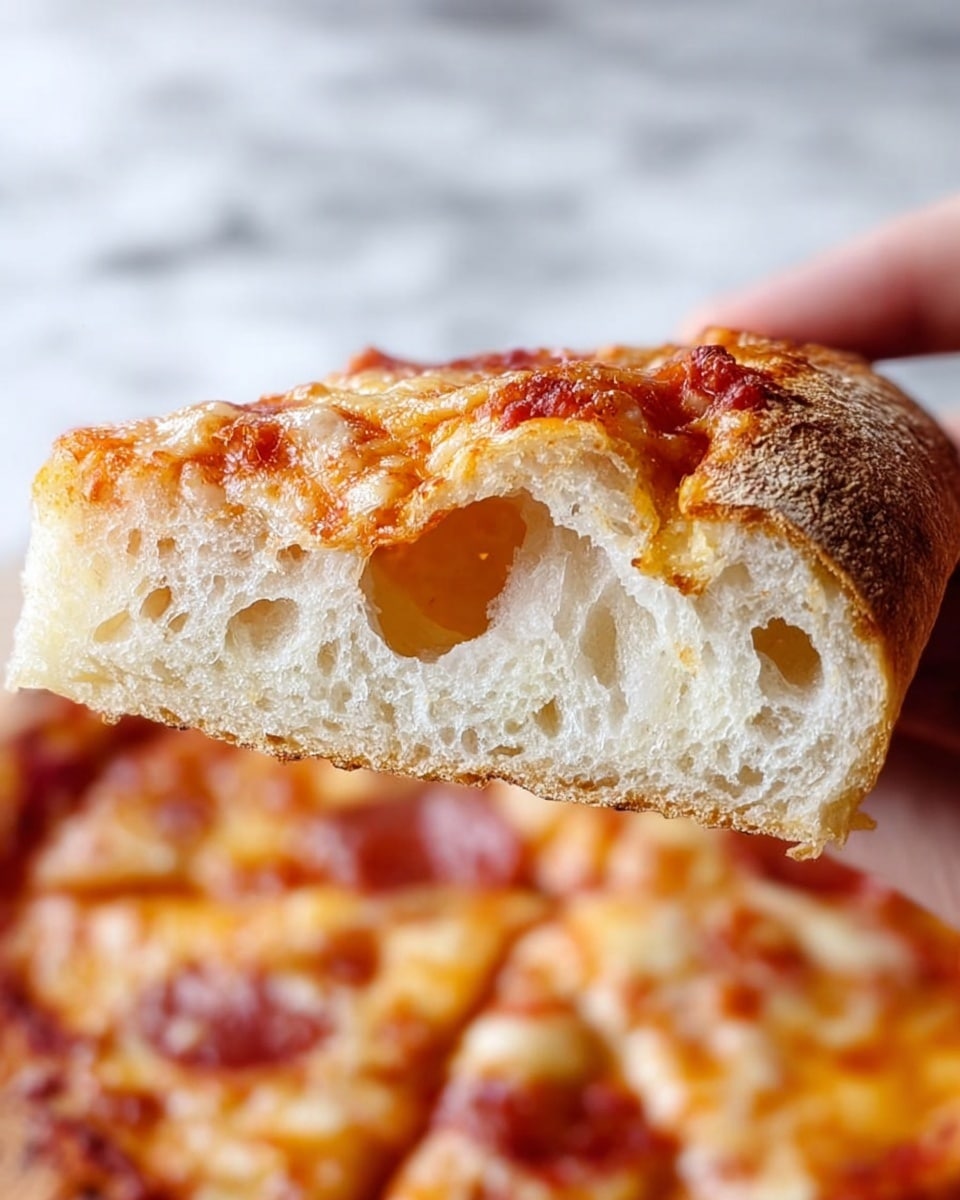
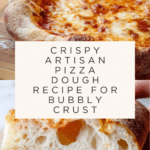
This artisan pizza dough creates a crispy, chewy, and bubbly crust that serves as the perfect base for your favorite toppings. With simple ingredients and straightforward steps, you can achieve bakery-quality pizza at home.
Ingredients
- 500g (3 3/4 cups plus 2 tbsp) all-purpose flour
- 375g (1 1/2 cups plus 2 tbsp) warm water, divided
- 1g (1/4 tsp) active dry yeast
- 10g (1 1/2 tsp) fine salt
Instructions
- Step 1: Mix the flour and all but 1 tablespoon of the warm water in a large bowl until just combined. Cover and let rest for 20 minutes. Sprinkle the yeast over the remaining water and set aside to dissolve.
- Step 2: Sprinkle salt over the dough surface. Stir the yeast mixture and pour it over the dough. Lightly wet your hand, reach under the dough and stretch a section over the top, folding repeatedly to cover the center. Pinch off 5–6 small chunks, wetting your hand if sticky, and fold the dough over itself several times. Repeat until yeast and salt are fully mixed into a shaggy dough. Cover and rest for about 1 hour.
- Step 3: Lightly wet your hand and fold the dough to develop gluten by stretching a section underneath and folding it toward the center. Rotate and repeat 4–5 times until the dough tightens into a ball. Invert the dough into a clean, lightly greased bowl with the seam down and top smooth. Cover and let rise until doubled, about 5–6 hours.
- Step 4: Turn the dough onto a floured surface and cut in half. Working with one piece at a time, stretch a quarter of the dough until you feel resistance and fold it over the center. Repeat with the remaining edges to form a loose ball. Turn so the seam is down. Cup your hands around the dough and gently pull it toward you, dragging the bottom to create tension. Rotate 90 degrees and repeat until the dough becomes tight and round.
- Step 5: Place dough balls on a greased plate, lightly oil the tops, cover, and rest at room temperature for about 1 hour. Preheat your oven during this time. If not using immediately, cover tightly and refrigerate for up to 2 days.
- Step 6: To make pizza, place a pizza steel, stone, or inverted baking sheet on the middle rack and preheat oven to 500°F (or highest temperature) for at least 45 minutes. Flour a pizza peel generously or lightly oil a cast iron pan and set aside.
- Step 7: Flatten one dough ball into a large disk with a thick 1-inch lip. Hold the edge and gently shape the dough into a 12-inch circle using gravity. Place on the floured pizza peel, adjust shape, and ensure it’s not sticking. For cast iron, shape dough to pan size and place inside.
- Step 8: Add sauce and toppings, leaving the 1-inch perimeter free. Slide the pizza onto the hot steel and bake for 5 minutes. Turn on the broiler and broil for 2–4 minutes until cheese melts and crust blisters golden. For cast iron, bake 15–20 minutes and broil briefly to char spots. Repeat with remaining dough and toppings.
Tips & Variations
- Use bread flour instead of all-purpose for an even chewier texture.
- Let the dough cold ferment in the refrigerator for up to 48 hours for enhanced flavor.
- If your dough sticks to the peel, add a little extra flour or cornmeal underneath.
- For thinner crust, gently stretch the dough further before adding toppings.
- Use a pizza stone or steel for best heat retention and a crisp crust.
Storage
Store the shaped dough balls tightly wrapped in plastic wrap in the refrigerator for up to 2 days. Allow dough to come to room temperature and rest for about an hour before shaping and baking. Leftover baked pizza is best reheated in a hot oven or skillet to retain crispiness.
How to Serve
Serve this delicious recipe with your favorite sides.
FAQs
Can I use instant yeast instead of active dry yeast?
Yes, you can substitute instant yeast using slightly less quantity and mix it directly with the flour, reducing the need for dissolving it in water first.
How do I know when the dough has risen enough?
The dough should roughly double in size and feel airy when gently pressed with a finger. If the indentation fills back slowly, the dough is ready.
PrintCrispy and Chewy Artisan Pizza Dough with Bubbly Crust Recipe

This artisan pizza dough recipe yields a crispy, chewy, and bubbly crust that’s perfect for homemade pizzas. Using a slow fermentation and a combination of folds to develop gluten, this dough provides an ideal texture and crust flavor that holds up well to various toppings and high-temperature baking on a pizza stone, steel, or cast iron pan.
- Prep Time: 10 minutes
- Cook Time: 10 to 25 minutes (depending on baking method)
- Total Time: 6 hours 20 minutes (including resting and rising times)
- Yield: 2 medium pizzas (about 12-inch each) 1x
- Category: Bread / Pizza Dough
- Method: Baking
- Cuisine: Italian
Ingredients
Dough Ingredients
- 500g (3 3/4 cups plus 2 tbsp) all-purpose flour
- 375g (1 1/2 cups water plus 2 tbsp) warm water, divided
- 1g (1/4 tsp) active dry yeast
- 10g (1 1/2 tsp) fine salt
Instructions
- Initial Mixing and Rest: Mix the flour with all but 1 tablespoon of the warm water in a large bowl until just combined. Cover the bowl and let the mixture rest for 20 minutes to hydrate the flour. Meanwhile, sprinkle the yeast over the remaining tablespoon of warm water and allow it to dissolve.
- Incorporate Yeast and Salt: Sprinkle salt evenly over the dough surface. Stir the yeast mixture briefly and pour it over the dough. Using a wet hand, reach under the dough and stretch a section up and fold it over the top repeatedly until the dough is covered. Pinch off 5–6 small chunks of the dough, fold each chunk over itself several times to combine the ingredients into a shaggy dough. Cover and let rest for about an hour.
- Gluten Development: With a wet hand, fold the dough by reaching underneath, stretching a section upwards, and folding it over the center. Rotate the bowl and repeat the fold 4–5 more times until the dough tightens into a ball. Invert the dough ball into a lightly greased clean bowl with the seam side down and the top smooth. Cover and allow it to rise until doubled in volume, approximately 5 to 6 hours.
- Divide and Shape Dough Balls: Turn the dough out onto a floured surface and cut in half. For each piece, stretch out one quarter until resistance is felt and fold back over the center, then repeat for the remaining edges to form a loose ball. Flip the ball seam side down, cup your hands around it, and gently drag it towards you while rotating to create tension and smooth the surface into a tight, round ball.
- Second Rest and Preheat Oven: Place the shaped dough balls on a greased plate, lightly oil the tops, cover, and let them rest at room temperature for about an hour. Preheat the oven during this time. If not baking immediately, cover tightly and refrigerate for up to 2 days.
- Prepare Baking Surface: Place a pizza steel, stone, or an inverted baking sheet on the middle oven rack and preheat the oven to 500°F (or as high as it goes). Allow the oven to heat for at least 45 minutes. Prepare a pizza peel by generously flouring it, or alternatively, lightly grease a cast iron pan with olive oil.
- Shape the Pizza Base: On a floured surface, flatten one dough ball into a large disk keeping a thick 1-inch lip around the edge. Hold the thick edge and gently stretch the dough by gravity to form a 12-inch circle. Transfer to the floured pizza peel and adjust the shape as necessary, ensuring it does not stick. Or shape to fit your cast iron pan and place inside.
- Add Sauce and Toppings: Spread sauce and toppings evenly over the dough leaving the 1-inch perimeter clear.
- Bake the Pizza: Slide the pizza onto the preheated steel or stone and bake for 5 minutes. Then switch to broil and broil for 2 to 4 minutes until the cheese melts and the crust is golden and blistered. If using a cast iron pan, bake for 15–20 minutes and broil for the last few minutes to achieve spots of char. Repeat with the remaining dough and toppings.
Notes
- Using warm water helps activate the yeast but ensure it’s not too hot to avoid killing the yeast.
- Resting and folding the dough multiple times develops gluten, leading to a chewy texture.
- Long fermentation (up to 6 hours) contributes to better dough flavor and texture.
- Preheating the baking surface thoroughly is critical for a crispy crust.
- If not cooking the dough immediately, store it in the refrigerator for up to 2 days, tightly wrapped.
- Flouring the pizza peel prevents the dough from sticking when transferring to the oven.
- Adjust baking and broiling times according to your oven for best results.
Keywords: artisan pizza dough, crispy pizza crust, chewy pizza crust, bubbly pizza crust, homemade pizza dough, pizza stone baking, no-knead pizza dough